Poptropica Shark Tooth Island Walkthrough
Shark tooth island is one of the earlier and easier island adventures in Poptropica. In this mission, you have to rescue Professor Hammerhead and a young boy who have been trapped on an island in Booga Bay. A giant shark is blocking the way so you’ll need to get the help of the local medicine man to come up with a plan to take care of the shark and perform the daring rescue. This video shows you how to do the full island very quickly. If you want the written instructions, keep reading below!
Poptropica Shark Tooth Island WalkthroughWhen you arrive on the island, head immediately all the way to the right and follow the sign to the Ancient Ruins. You can stop by and visit some of the buildings like the Shark Museum on the way, but they’re not necessary for completing the mission. Go through the next short room and head to the right. You’ll arrive in the ancient ruins. Go all the way to the right and watch out for the dropping coconuts as you go. Go to the end and you’ll see a sign for Booga Bay. Go right again and head for the bay.
Go right through this short room and then you’ll arrive in lovely Booga Bay. Talk to the first guy you see at the Grass Skirts stand. He’ll give you a grass skirt so that you will look like a native islander. Put on the grass skirt and then head back left to the ancient ruins. When you arrive in the ruins, jump over the big stone in the middle so that you are standing on the left side of it and then push it to the right until it is underneath the vine right next to the palm tree. Now jump up on the top of the block. Watch out for falling coconuts and then jump up again to catch the vine.
Continue climbing up the vine and jumping up on the platforms on the tree until you get to the very top, where you’ll find a medicine man. He will talk to you because you look like an islander in your grass skirt. Click on him and ask him, “What else can you tell me?” He will tell you that deep in the temple there is a wall carving that will show you what you need to bring to him so that he can make a potion that will put the big shark to sleep.
Jump off the platform and keep going down until you reach the ground. Walk a short distance to the left and you’ll see the entrance to the temple. It is in the mouth of the big statue and has spider webs in it. Go inside and then jump down the platforms in the first area.
Soon, you’ll be standing on a platform and there will be a swinging platform to your left. Time your jump so that you land on it and then keep moving to the left. You’ll reach a wall and then will need to go all the way to the bottom. Watch out for the purple bats, who will knock you over. Once you get to the bottom, go left and then jump all the way up again. Soon you’ll see a big green control panel in the upper left corner. Jump up onto that platform and click on the panel.
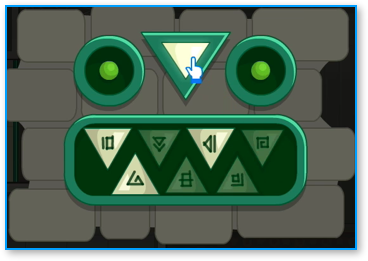
This panel will open the door to the left, but only if you press the correct teeth in the mouth. Counting from the left, you need to click on the 3rd, 4th, 6th and 7th teeth. Then press the big triangle above the teeth and between the two eyes. The door will open and you can go through it to the left. Keep going through the next passage and you’ll arrive inside a large chamber with a green vine hanging down. This one works a lot like the chamber before. Just jump onto the vine and drop all the way down to the bottom. Go left some more and you’ll come up to a big golden statue of the shark. Jump up on top of that statue and then over it. At this point, you can either jump up onto the swinging panel above you and keep going left, or just head straight across. If you jump up, you’ll get to a small pit with spikes in the walls. Jump down here and you’ll land next to an old skeleton with a bone in its mouth. Walk over to the bone to pick it up.
Now head right and go back to the shark statue. Climb back up to the top and jump on the swinging platform and go left until you get to the pit with the spikes in the walls. Wait here for the sliding platform to come close and then jump on it. Ride it to the other side of the pit and then jump off and exit to the left. Go through the passageway and you’ll arrive in another chamber with a green vine. Just jump down here and run across the floor until you get to a giant pedestal with an urn holding some green stuff in it. Jump up on top of that and you will get the Key Ingredient. There’s a vine here. Jump up onto it and climb up to leave the chamber. You’ll be in a small room with platforms. Keep jumping up to the top and then exit.
You’ll appear out of a hole in the sand right at the beginning part of the island next to the guy selling shark fins. You can get one from him if you like, but you don’t need it to solve the mission. Now walk to the right a little and talk to the guy standing next to the booth outside the Coconut Cafe. He will give you some carbonated coconut milk, which is the 3rd and final ingredient you need to bring to the Medicine Man.
Now go to the right and head for the ancient ruins. Push the stone in the middle back underneath the vine next to the tree and go back up to visit the Medicine Man. He will take all of the ingredients and create a potion for you. You’ll get the Calming Potion from him, which can be used to calm the Great Booga Shark. Jump off the tree to the right and head to Booga Bay.
After you arrive in Booga Bay, go to the right until you pass a fisherman and arrive at a cannon with a sign next to it that says, “Feed the Shark.” Click on the cannon and point it up in the air and then click again to launch the coconut with the potion in it into the bay. As soon as it lands in the water, the great Booga shark will appear and eat it. He’ll turn green and then fall asleep below the water. Click on the “Back” button in the upper-right corner of the game to return to the main screen. Now you can safely cross the water while the shark is sleeping. Cross the island and you will come to a small island. Go right at the end and you will then arrive next to Professor Hammerhead.
Talk to Professor Hammerhead and he will thank you for rescuing him and the boy and ask you to lead them back to the mainland. Head to the left again and back across the water. Both the professor and the boy will follow you. When you arrive back to where the crying woman is standing, she will thank you for rescuing her son. Professor Hammerhead will then give you a gold medallion and you have completed the adventure. Congratulations!
Shark tooth island is one of the earlier and easier island adventures in Poptropica. In this mission, you have to rescue Professor Hammerhead and a young boy who have been trapped on an island in Booga Bay. A giant shark is blocking the way so you’ll need to get the help of the local medicine man to come up with a plan to take care of the shark and perform the daring rescue. This video shows you how to do the full island very quickly. If you want the written instructions, keep reading below!
Poptropica Shark Tooth Island WalkthroughWhen you arrive on the island, head immediately all the way to the right and follow the sign to the Ancient Ruins. You can stop by and visit some of the buildings like the Shark Museum on the way, but they’re not necessary for completing the mission. Go through the next short room and head to the right. You’ll arrive in the ancient ruins. Go all the way to the right and watch out for the dropping coconuts as you go. Go to the end and you’ll see a sign for Booga Bay. Go right again and head for the bay.
Go right through this short room and then you’ll arrive in lovely Booga Bay. Talk to the first guy you see at the Grass Skirts stand. He’ll give you a grass skirt so that you will look like a native islander. Put on the grass skirt and then head back left to the ancient ruins. When you arrive in the ruins, jump over the big stone in the middle so that you are standing on the left side of it and then push it to the right until it is underneath the vine right next to the palm tree. Now jump up on the top of the block. Watch out for falling coconuts and then jump up again to catch the vine.
Continue climbing up the vine and jumping up on the platforms on the tree until you get to the very top, where you’ll find a medicine man. He will talk to you because you look like an islander in your grass skirt. Click on him and ask him, “What else can you tell me?” He will tell you that deep in the temple there is a wall carving that will show you what you need to bring to him so that he can make a potion that will put the big shark to sleep.
Jump off the platform and keep going down until you reach the ground. Walk a short distance to the left and you’ll see the entrance to the temple. It is in the mouth of the big statue and has spider webs in it. Go inside and then jump down the platforms in the first area.
Soon, you’ll be standing on a platform and there will be a swinging platform to your left. Time your jump so that you land on it and then keep moving to the left. You’ll reach a wall and then will need to go all the way to the bottom. Watch out for the purple bats, who will knock you over. Once you get to the bottom, go left and then jump all the way up again. Soon you’ll see a big green control panel in the upper left corner. Jump up onto that platform and click on the panel.
This panel will open the door to the left, but only if you press the correct teeth in the mouth. Counting from the left, you need to click on the 3rd, 4th, 6th and 7th teeth. Then press the big triangle above the teeth and between the two eyes. The door will open and you can go through it to the left. Keep going through the next passage and you’ll arrive inside a large chamber with a green vine hanging down. This one works a lot like the chamber before. Just jump onto the vine and drop all the way down to the bottom. Go left some more and you’ll come up to a big golden statue of the shark. Jump up on top of that statue and then over it. At this point, you can either jump up onto the swinging panel above you and keep going left, or just head straight across. If you jump up, you’ll get to a small pit with spikes in the walls. Jump down here and you’ll land next to an old skeleton with a bone in its mouth. Walk over to the bone to pick it up.
Now head right and go back to the shark statue. Climb back up to the top and jump on the swinging platform and go left until you get to the pit with the spikes in the walls. Wait here for the sliding platform to come close and then jump on it. Ride it to the other side of the pit and then jump off and exit to the left. Go through the passageway and you’ll arrive in another chamber with a green vine. Just jump down here and run across the floor until you get to a giant pedestal with an urn holding some green stuff in it. Jump up on top of that and you will get the Key Ingredient. There’s a vine here. Jump up onto it and climb up to leave the chamber. You’ll be in a small room with platforms. Keep jumping up to the top and then exit.
You’ll appear out of a hole in the sand right at the beginning part of the island next to the guy selling shark fins. You can get one from him if you like, but you don’t need it to solve the mission. Now walk to the right a little and talk to the guy standing next to the booth outside the Coconut Cafe. He will give you some carbonated coconut milk, which is the 3rd and final ingredient you need to bring to the Medicine Man.
Now go to the right and head for the ancient ruins. Push the stone in the middle back underneath the vine next to the tree and go back up to visit the Medicine Man. He will take all of the ingredients and create a potion for you. You’ll get the Calming Potion from him, which can be used to calm the Great Booga Shark. Jump off the tree to the right and head to Booga Bay.
After you arrive in Booga Bay, go to the right until you pass a fisherman and arrive at a cannon with a sign next to it that says, “Feed the Shark.” Click on the cannon and point it up in the air and then click again to launch the coconut with the potion in it into the bay. As soon as it lands in the water, the great Booga shark will appear and eat it. He’ll turn green and then fall asleep below the water. Click on the “Back” button in the upper-right corner of the game to return to the main screen. Now you can safely cross the water while the shark is sleeping. Cross the island and you will come to a small island. Go right at the end and you will then arrive next to Professor Hammerhead.
Talk to Professor Hammerhead and he will thank you for rescuing him and the boy and ask you to lead them back to the mainland. Head to the left again and back across the water. Both the professor and the boy will follow you. When you arrive back to where the crying woman is standing, she will thank you for rescuing her son. Professor Hammerhead will then give you a gold medallion and you have completed the adventure. Congratulations!
